Doesn’t it make you green with envy when you see all those incredible travel pictures on Instagram and your photies look nowhere near as amazing. Is it really that hard to shoot good photos? Actually, if you want to have better photos or interested in being an amateur travel photographer, there are some basic rules and tips that you need to know. And guess what? We found an expert for you, meet Joe.
Joe is a self-taught photographer and part-time musician. He studied IT (Information Technology) and actually went on to become an IT teacher before he quit his job in 2006. He started photography in 2013 (shooting on his phone) and got his first professional job (and his first camera) in December 2014. Needless to say, he hasn’t looked back since.
This interview will be a roadmap for you to develop yourself as a travel photographer. By following these tips,your photos will never be the same. Here are our questions and Joe’s super helpful answers.
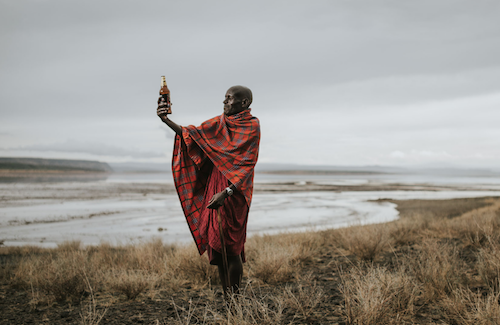
(All the photos are from Joe’s Instagram gallery. His profile: @Jaydabliu)
Do you travel with one camera? Or do you have many? Do you photograph with your phone?
Yes, I do travel with one camera with lenses that fit my needs. I just make sure all my batteries are charged before every trip so I never run out. I do shoot on my phone as well. Especially when I’m doing street photography. Walking around with a DSLR camera can sometimes be intimidating or attract unwanted attention. One thing I want to invest in is a small mirrorless camera. Like a Fuji X100s.
How do you define ‘professional camera’?
A professional camera is one that has features that help the photographer achieve the results he/she wants. To me it’s just a tool… “professional” is relative from person to person.
Can a person be a travel photographer with just a good mobile phone?
Absolutely. I know people who shoot only on phone and get amazing results. I’ve done it myself too.
What kind of camera would you advise an up and coming photographer on a tight budget?
I would advice to get a camera within your budget and that gets you the results you want to achieve (This means find out if it has good low light capability if you’re going to be shooting in dark spaces, etc). I started on a Nikon D5200. It was $500 at the time. I needed to get a portrait lens with it so the cheap cost of the camera allowed me to have enough left for a 50mm f1.8 lens.
Does tripod a necessity?
It depends on your photography needs. If you shoot landscapes in the evenings or interior spaces, you may need a tripod…If you shoot portraits, you will rarely find yourself needing a tripod (Though there are specific situations that may require it)…So as you can see, it depends. There is no absolute.
What would you advise on a travel photography starter pack?
A camera for one :-), I would recommend that you have a wide to standard range of focal lenghts (That means lenses with a range anywhere from 16mm, 18mm to 70mm) In my kit I have a 15mm-30mm lens that I use as a walkaround lens…Then I have a 35mm prime lens, a 50mm and a 70-200mm lens. A tripod would be great if you wish to photograph yourself in the places you visit.
Do you use any editing apps or programs? If so, which are they?
I do. I use Lightroom and Photoshop on my computer. On phone I use VSCO, Snapseed and the Instagram app for edits.
Do you have tips for photographing iconic structures in an unusual and striking way?
I would say, for iconic structures, try to use the surrounding as a backdrop however you can. Context always makes a picture more powerful. For example, If you’re in London and you’re trying to take a picture of Big Ben, if it stands alone, it’s great.. but imagine if there was a London bus passing by the bridge with Big Ben in the background… Not only have you captured the iconic tower but you’ve also given us the context of where it is and how it relates to the surrounding. Now that’s a powerful picture.
Do you ever photograph yourself; if so, what are your methods for doing so?
I do photograph myself. This is where a tripod comes in when shooting portraits. I place the camera on a tripod, compose my shot, set the timer (something like 10 seconds will give me enough time to get into the shot).
What is the most important rule of day light? What is the golden hour for the photography?
Golden hour is usually the best time to shoot due to the softness and colour of the light. Things are more naturally saturated during golden hour (Which in essence is an hour and a half before sunset or half an hour into sunrise and an hour after sunrise). Though there is no such thing as “bad light”, it’s usually considered the best time to shoot because shadows are not as strong due to the soft light from the angle of the sun. I normally shoot for early mornings till about 10am or evenings from 4pm. That is not to say you should not shoot at 12pm... Any light is good light as long as it works for the situation you’re aiming for. For example, you can use 12pmlight to illustrate hardships of people working in a field. The harsh light fits the story of your image.
What is this popular “rule of 3”? Why it’s important?
The “rule of thirds” is a photo composition rule that uses a grid to show you where best to place your subject in an image. If you divide your frame into three parts horizontally and vertically, it will give you a grid. A photo is always more appealing when you place the main subject of your photo where the lines of the grid meet. That means your subject is at a third of your image either horizontally or vertically. That’s what the rule of thirds is.
Do you think following this rule is a must?
Could a bad weather be a good opportunity for shooting? Snow, rain, clouds… is there a way to create a good composition in those conditions?
Interestingly, YES. I prefer shooting in bad weather.
Reason being, you will always get unique points of view and different from every day images. Many people don’t like shooting in bad weather…so first of all, there’s a high chance no one will have images like yours. Secondly, because a place may look slightly different than if it was good weather…and people will act differently when weather is “bad”. That’s what will give you that uniqueness.
What are the things to be considered when choosing a background?
When choosing a background, you have to make sure it adds to the story you’re trying to communicate with your image. Remember, you are the storyteller…So everything in your image has to be deliberately there. The audience only sees what you choose to include in the image. What I personally look for when including backgrounds; Does it add to the story of my subject or does it compete with my subject? That’s my default.
What are the tips to find the best composition?
Think of composition like a movie. A movie is a continuous stream of still images very well composed and put together and is always pleasing to the eye. I always ask myself if my image would fit in a movie scene (Would it tell a story?)… That’s what determines what the background is, where my subject is placed in the frame in relation to the other things in the frame.
Do you think images became more powerful with human?
I think images with humans are more relatable. I think having a human in the image gives us an opportunity to try and feel what the person is feeling, and gives a sense of how the place is like (By how it treats or relates with the human). There’s no greater context than human context because we are human.
How can we get the best sunrise&sunset photos?
First, I’d say get there maybe an hour or so earlier (So you can set up and get ready for the moment beforehand). If it’s a sunrise/sunset against a nice landscape, try and get as much in frame as possible for context (Pictures of the sunset itself will not be as appealing). As an added tip, try and shoot in aperture priority mode (that would be “A” on your mode dial if you’re shooting on Nikon or other models, “AV” if you’re shooting on Canon. Make sure your ISO is at your lowest possible (100 or 200 on most cameras) and that your camera is on a tripod. Dial your aperture to somewhere like f11 or f13 (Most lenses are sharpest between f8 and f13..Also, shooting on higher aperture numbers will give your sun a nice starburst). Focus your shot on infinity (That would be this sign on your lens ∞). Fire away. If you have a wireless remote to trigger your shot, that would be great. If you don’t have a remote, you can set your camera on timer to prevent shake when you’re clicking the shutter.
Any other advise you would give to a budding travel photographers?
I would say shoot, shoot, shoot. The more you shoot, the more you learn. Most tips will be theoretical and will only work for you if you try. Use your backyard, use your neighbourhood, practice walking around and asking to take photos of strangers.
A travel photographer has to have the ability to interact with people so try it on your family, try it on your friends. Shoot, shoot, shoot.
After all these inspiration, if you want to see some amazing Instagram photos of Nairobi, check this article too!
Why not sign up for our weekly newsletter and be the first to take advantage of fast-selling fares? Click here to never miss the best travel deals.